How do I create a subcontract in Beam?
In order to set up a subcontract and pay a vendor, you'll want to follow these steps:
- Click on the relevant project in your projects page and go to the Subcontracts tab on the left hand side of the page.
- Select the vendor and add your schedule of values (or select it from a previous subcontract). You can add the cost codes and click "Add" The subcontract is now living inside the project page.
How do I pay a bill for a project?
- When you're ready to pay your vendor, select the "Bills" tab on the left hand side of the page.
- On the next page, you have two options:
- If you'd like to associate the bill with a subcontract, select "For a subcontract"
- Add a document if you have one associated with this bill (e.g., an invoice from the vendor)
- Select the relevant subcontract, update the due date, and invoice number as you'd like
- On the line items, you can choose the % or dollar value to pay against each of the scheduled values. Click "Finalize and add"
- If you would not like to associate the bill with a subcontract, select "One-off for a project"
- Specify which vendor the bill is from and update the due date and invoice number as you'd like
- Add accounting codes (if desired), descriptions, and amount for each item in this bill. Click "Finalize and add"
- If you'd like to associate the bill with a subcontract, select "For a subcontract"
- Add an invoice memo or any attachments
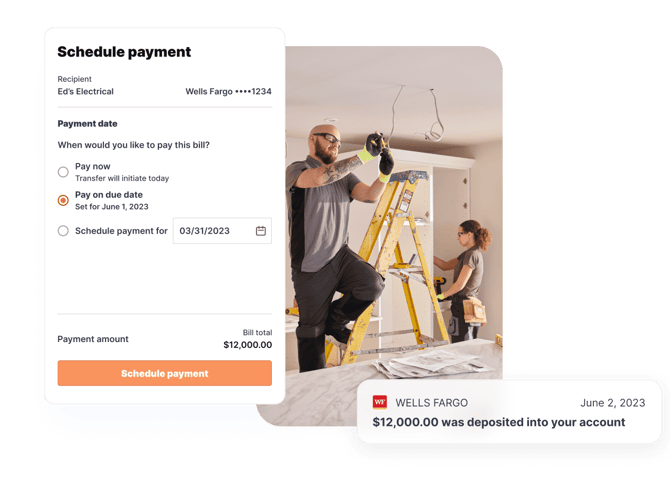
- Schedule the bill for payment. If you have the vendor's bank information, you can add it here. If not, they will receive an email from Beam asking them to add it in order to be paid.
Every time you add a bill, it’ll be automatically reconciled against existing subcontracts and change orders.
What are the benefits of paying my subs with Beam?
- Speed: ACH in 1-2 businesses day(s) and 0-1 business day if you pay through the Beam balance!
- Flexibility and freedom: No payment limits
- Peace of mind: Incredibly easy and transparent for you and your subcontractor
- Visibility: Each bill can be reconciled against your project budget (exclusive to our Plus and Scale tiers)